Introduction to Bake Chocolate Biscuit Cake
When it comes to dessert, few treats evoke as much joy as a rich, indulgent chocolate biscuit cake. This delightful dessert, often celebrated for its simplicity and depth of flavor, has charmed palates for generations. But what exactly makes chocolate biscuit cake a beloved dessert among so many?
The Allure of Chocolate Biscuit Cake
To start, bake chocolate biscuit cake embraces two of the world’s favorite ingredients: chocolate and biscuits (or cookies, depending on where you hail from). The combination creates a no-bake cake that’s rich and decadent yet surprisingly easy to prepare—a perfect option for busy young professionals eager to impress guests without spending hours in the kitchen.
- Versatility: Whether you prefer a dark chocolate base or a milk chocolate twist, this recipe is highly adaptable. You can incorporate nuts, dried fruits, or even a splash of coffee to enhance the flavor profile.
- Simplicity: No complex techniques or fancy equipment are required. All you need are a few basic ingredients—chocolate, biscuits, butter, and your choice of flavorings—to create a dessert that often leaves your guests asking for seconds.
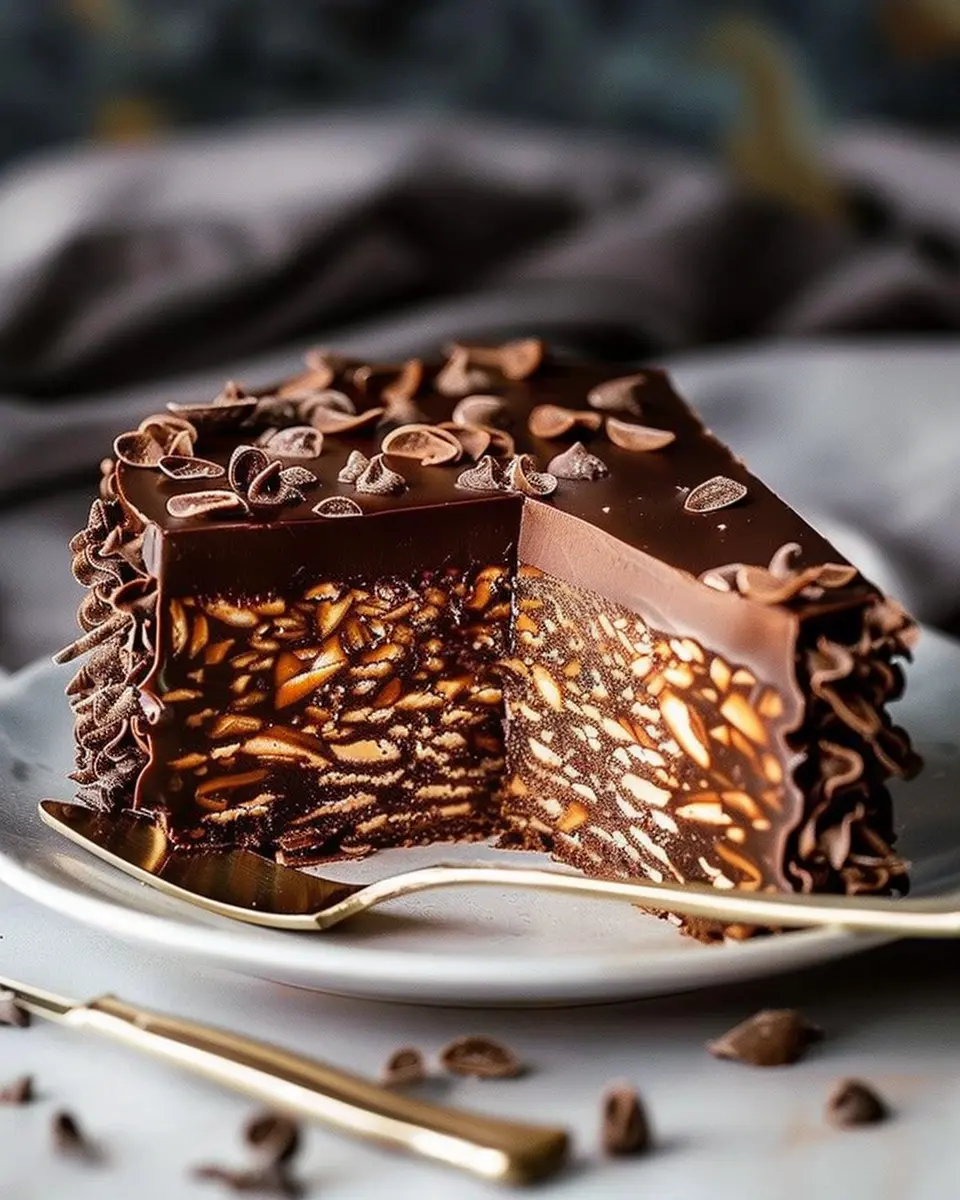
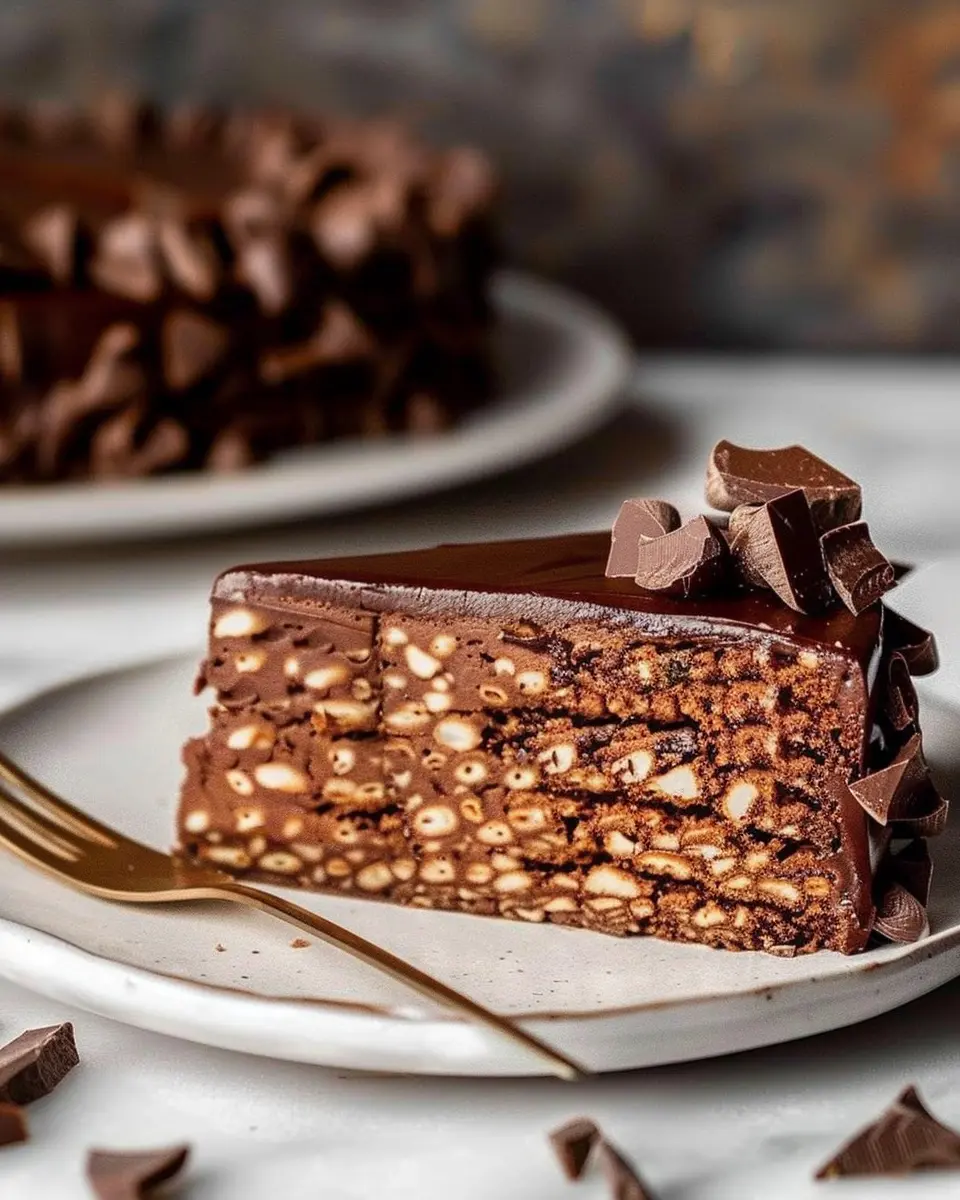
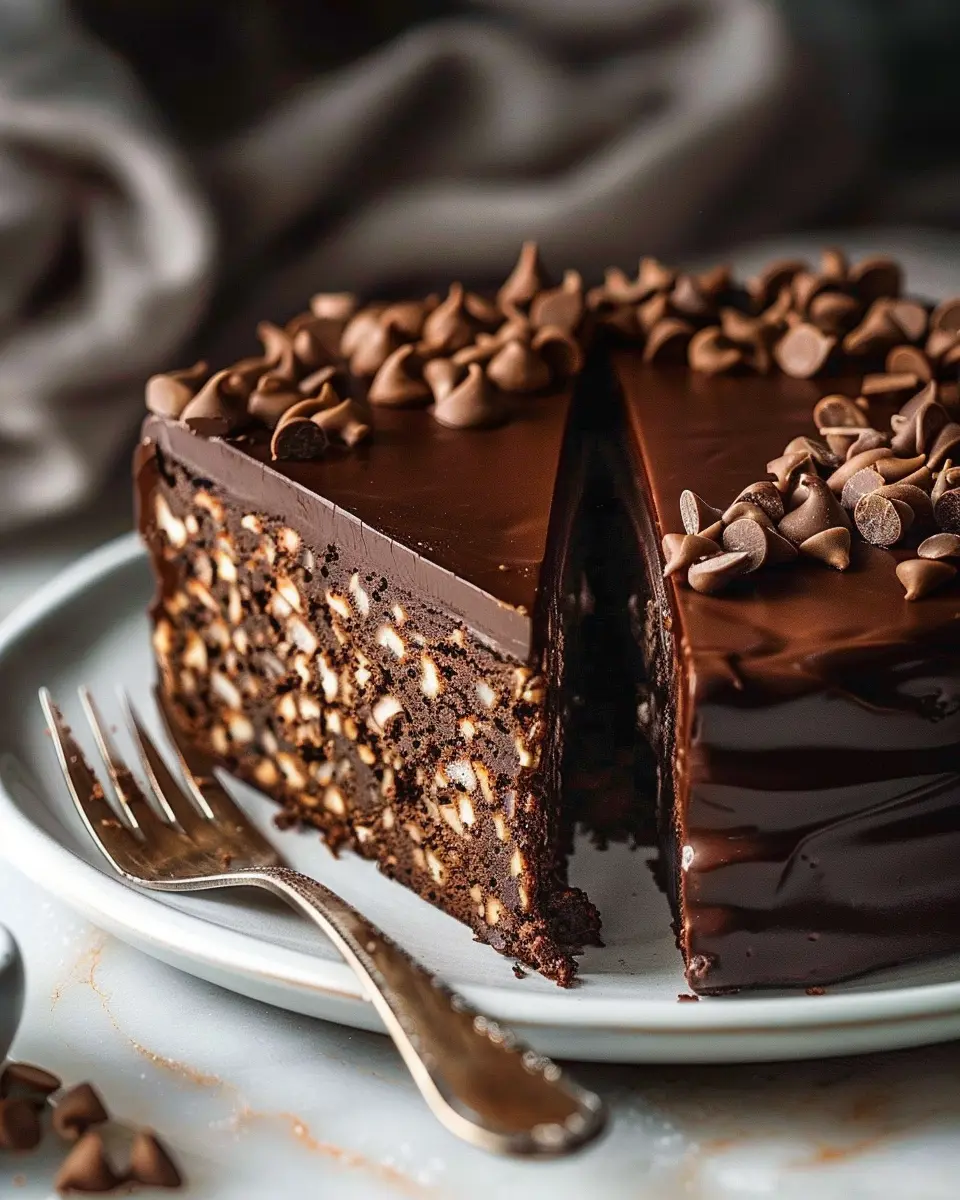
- Visual Appeal: A beautifully assembled chocolate biscuit cake is more than just a treat; it’s a centerpiece. The layers of crushed biscuits interspersed with rich chocolate create a stunning visual that’s hard to resist.
In fact, according to a 2021 survey by Statista, over 50% of dessert lovers ranked chocolate as their favorite flavor. That speaks volumes about why bake chocolate biscuit cake remains a favorite across cultures and generations.
A Personal Touch
What I find particularly special about this cake is the memories it can evoke. I remember the first time I collaborated with friends to whip it up for a gathering. We laughed, shared stories, and of course, indulged in tasting the chocolate mixture. The joy of crafting something delicious together is a big part of what makes baking so rewarding. Plus, the look on everyone’s faces as they took their first bites was priceless.
So, if you’re ready to impress at your next gathering or simply spoil yourself after a long week, let’s dive into how to bake chocolate biscuit cake that’s sure to delight!
Ingredients for Chocolate Biscuit Cake
Essential ingredients for a royal treat
When you decide to bake chocolate biscuit cake, having the right ingredients is key to achieving that rich, decadent flavor. Let’s dive into the essentials!
- Digestive Biscuits: These will form the base of your cake. Higher-quality biscuits will lead to a more exquisite texture.
- Dark Chocolate: Aim for at least 70% cocoa for a deeper flavor. Melt it for a glossy finish that will make this treat irresistible.
- Butter: Unsalted butter works best as it allows you to control the saltiness of your cake.
- Golden Syrup: This adds sweetness and moisture, helping to bind the biscuits together perfectly. It’s a must-have ingredient, so don’t skip it!
- Heavy Cream: For a lush frosting, whipping cream will create a luxurious layer that elevates the cake to new heights.
- Optional Nuts: Chopped hazelnuts or almonds can add a delightful crunch and an added depth of flavor.
Before you start baking, gather these ingredients, and perhaps put on your favorite playlist—good vibes are essential in the kitchen! If you’re curious about variations, check out this informative guide on chocolate types.
Ready to indulge your friends and yourself? Let’s get baking!
Preparing Chocolate Biscuit Cake
When you’re looking for a quick, no-bake dessert that doesn’t skimp on flavor, baking a chocolate biscuit cake is the way to go. It’s a straightforward recipe that calls for simple ingredients and requires no fancy equipment. So, let’s roll up our sleeves and dive into making this delightful treat!
Gather your ingredients
Before we start mixing and matching, it’s essential to gather all your ingredients. You’ll need:
- 200g of digestive biscuits (or your favorite type)
- 75g of unsalted butter
- 100g of granulated sugar
- 200g of dark chocolate (at least 70% cocoa)
- 50ml of milk (you can also use almond or oat milk for a dairy-free option)
Make sure you have these items on hand, as they are the backbone of your delicious chocolate biscuit cake. Good quality chocolate will greatly enhance the flavor; don’t hesitate to splurge a little.
Grease the cake tin
Now that you have your ingredients ready, it’s time to grease your cake tin. Use a round loose-bottom tin, approximately 20-23cm in diameter. Simply apply a thin layer of butter or line the base with parchment paper. This step ensures that your cake will release smoothly once it’s set.
Crush the biscuits
Now comes the satisfying part! Take your digestive biscuits and crush them into small pieces. You can do this by placing them in a ziplock bag and using a rolling pin to break them down. Alternatively, a food processor can make quick work of this, though I find the good old-fashioned method adds a bit of therapeutic fun to the process. Aim for a mix of larger chunks and finer crumbs for that delightful texture.
Mix the butter and sugar
In a mixing bowl, combine the butter and sugar. Using an electric mixer or a sturdy whisk, blend them until the mixture is creamy and pale. This process can take a few minutes, so don’t rush it. This fluffy mixture will create a rich base for your chocolate cake.
Melt the chocolate
Next, it’s time to melt the chocolate. You can do this using a double boiler or simply in the microwave—just be cautious not to overheat it. If you’re using the microwave, melt in short bursts of 30 seconds, stirring each time until fully melted. The goal is a smooth, silky chocolate that will combine beautifully with the other ingredients.
Combine the chocolate mixture with the biscuits
Once your chocolate has melted, let it cool slightly. Then, pour the chocolate over your biscuits and butter mixture. Gently fold everything together, ensuring that every crumb is enveloped in the rich chocolate goodness. This is the moment when your creation begins to take shape; it’s genuinely satisfying to see it all come together.
Chill the mixture in the cake tin
Transfer the mixture into the greased cake tin. Spread it evenly and press down firmly to ensure it holds its shape. Now, cover the tin with some cling film, and pop it in the fridge for at least two hours, or until it’s set. This step is crucial as it allows the flavors to meld beautifully.
Prepare the chocolate icing
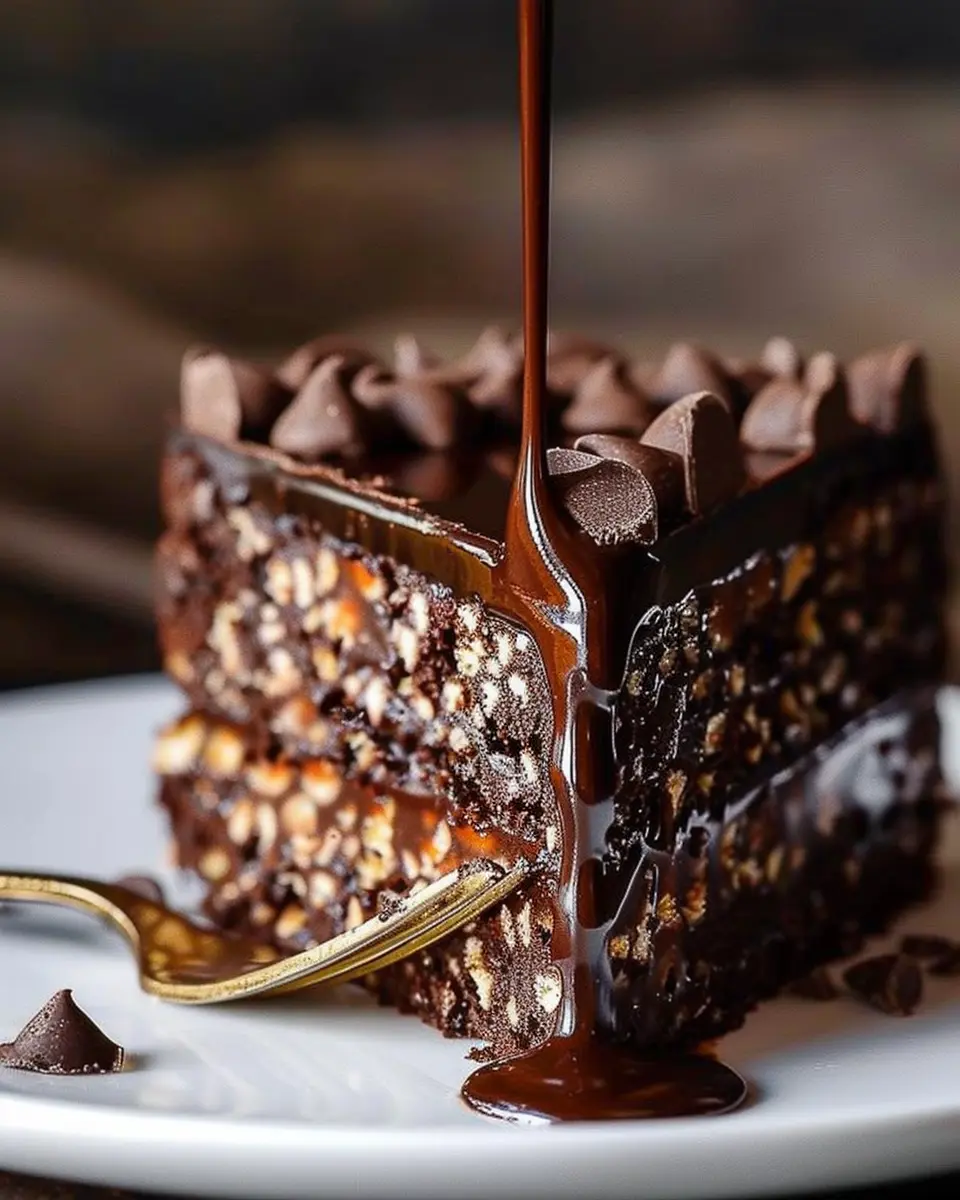
While your cake sets in the fridge, prepare the chocolate icing. Melt another 100g of dark chocolate, adding a tablespoon of butter for a glossy finish. Allow it to cool slightly before icing your cake later.
Coat the cake and set
Once your cake has fully chilled, remove it from the tin. Pour the prepared icing over the top, allowing it to cascade down the sides. Spread it evenly across the surface, then place it back in the fridge for another 30 minutes to set the icing.
Decorate the cake
Now, for the fun part—decorating your cake. You can use chocolate shavings, crushed nuts, or even edible flowers for an elegant touch. Personalize it the way you want; after all, this is your creation.
With a little patience and creativity, you’ve successfully made a delightful chocolate biscuit cake that will impress anyone lucky enough to enjoy a slice! For more tips on desserts and baking techniques, check out resources like BBC Good Food and Serious Eats. Happy baking!
Variations on Chocolate Biscuit Cake
When you bake chocolate biscuit cake, the possibilities are endless! It’s not just a single-layer dessert—your imagination is the limit. Here are some delightful twists to elevate your cake to new heights.
Chocolate Biscuit Cake with Nuts
For those who appreciate a bit of crunch, adding nuts can transform your cake into something extraordinary. Chopped walnuts, pecans, or even hazelnuts can provide a rich, earthy flavor that complements the chocolate beautifully. Just toast them lightly before mixing them in for an additional layer of flavor. Consider exploring this Healthline article on nuts to understand the health benefits they offer, making your dessert a tad healthier!
A Fruity Twist with Berries
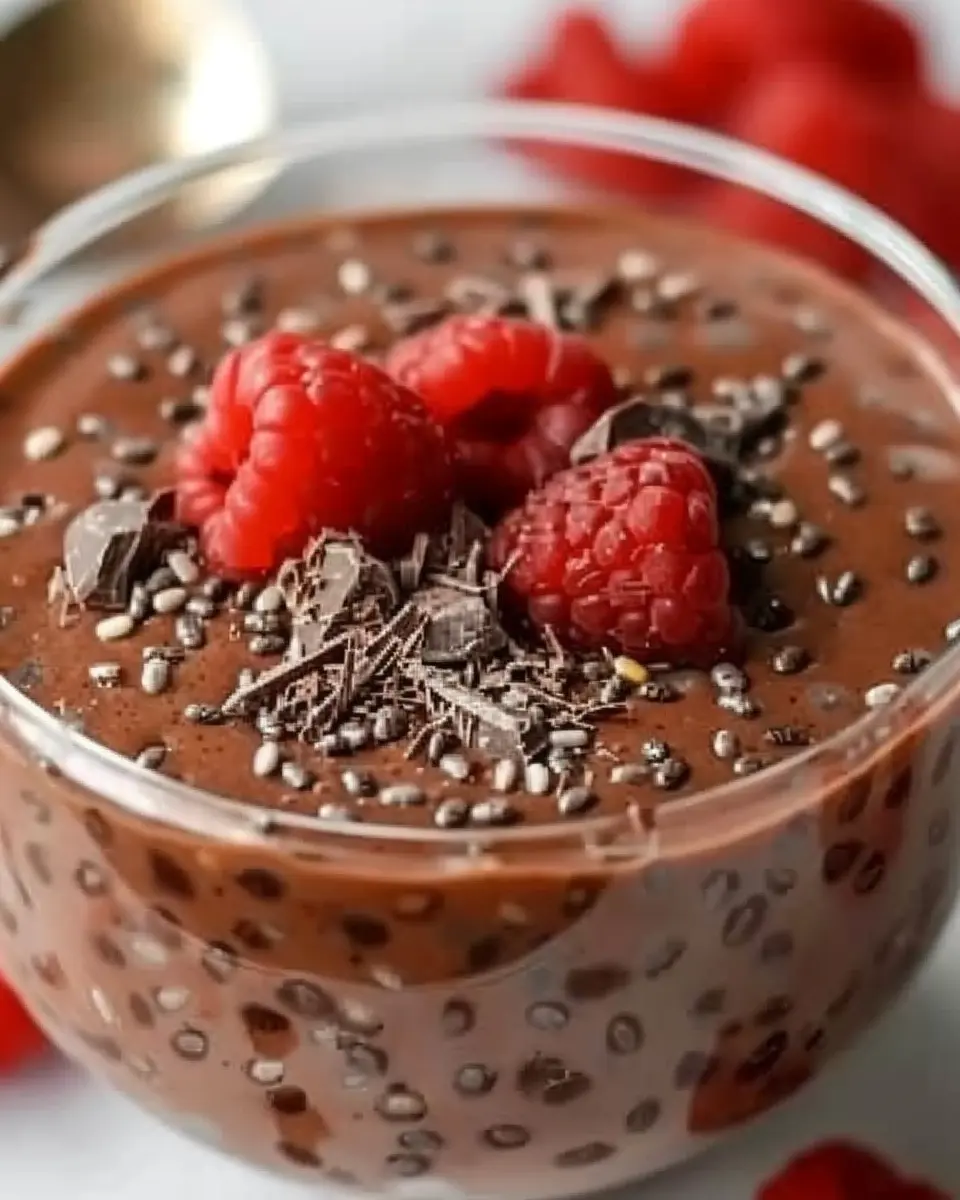
Feeling fruity? Incorporating fresh or freeze-dried berries can add a surprising tartness that contrasts wonderfully with the sweetness of the chocolate. Raspberries or strawberries are particularly popular choices, and they not only enhance the flavor but also introduce a pop of color. Imagine serving a slice with a handful of berries on the side—talk about an appealing presentation!
Add a Sprinkle of Sea Salt
Don’t underestimate the power of a little seasoning. A light sprinkle of flaky sea salt atop your chocolate biscuit cake can create an irresistible sweet-savory balance. This simple addition can intensify the chocolate flavor, making each bite memorable. Plus, it elevates the overall aesthetic of the cake—who doesn’t love a touch of elegance?
With these variations, you can easily personalize your chocolate biscuit cake to suit your mood or the occasion. So, what are you waiting for? Get baking!
Baking notes for Chocolate Biscuit Cake
Tips for a smooth chocolate coating
When you bake chocolate biscuit cake, achieving that glossy chocolate coating can be a gamechanger! Here are a few tips to help you out:
- Use Quality Chocolate: Always opt for high-quality chocolate. It melts better and gives a richer flavor.
- Tempering Process: Gently melt your chocolate in a double boiler to ensure it stays smooth. Avoid overheating—it can seize up if it gets too hot.
- Even Coating: To apply, pour the melted chocolate over the cake while it’s on a wire rack to catch any drips. A spatula can help you spread it evenly.
Storing the cake properly
Once you’ve baked your glorious cake, it’s important to store it right! Wrap it tightly in plastic wrap and keep it in the fridge; it will stay fresh for up to a week. For longer storage, consider slicing it and freezing individual pieces. They’ll last for about 2 months—perfect for those midnight cravings!
For more expert baking tips, check out resources from The Kitchn or BBC Good Food. Happy baking!
Serving suggestions for Chocolate Biscuit Cake
Pairing with a cup of tea
What’s better than a rich, chocolate biscuit cake alongside a warm cup of tea? It’s a match made in heaven, elevating your dessert experience. The subtle tannins of black tea complement the sweetness of the cake, while herbal teas like chamomile offer a gentle contrast. A classic English Breakfast tea or an Earl Grey can enhance the flavor profile beautifully.
Ideal serving sizes
When it comes to baking your chocolate biscuit cake, consider portion sizes that fit the occasion. For a casual coffee break, cut small squares—think bite-sized bliss that encourages sharing (or indulging solo). If you’re hosting a gathering, larger slices add a touch of elegance. Generally, aim for:
- Small squares: 2-inch pieces
- Medium slices: 3-inch pieces
- Large portions: 4-inch slices
Experiment and see what feels right for you! Remember, it’s all about celebrating flavor and joy. For more dessert ideas and serving tips, visit BBC Good Food or Serious Eats. Enjoy!
Tips for Making Perfect Chocolate Biscuit Cake
Common Mistakes to Avoid
When you bake chocolate biscuit cake, it’s easy to slip up, especially if you’re a beginner. Here are some common pitfalls to watch out for:
-
Using the wrong chocolate: Always opt for high-quality dark chocolate. Cheap chocolate can lead to a subpar flavor. Go for brands with a cocoa content of at least 70% for richness.
-
Overmixing: When combining your ingredients, mix just until incorporated. Over-mixing can make your cake dense rather than light and crumbly.
-
Ignoring cooling time: After baking, let your cake cool in the refrigerator for at least 2 hours. This step helps the cake set and enhances its texture.
For more culinary tips, check out this guide on avoiding common baking mistakes here.
How to Achieve the Best Texture
For that perfect, melt-in-your-mouth texture:
-
Choose the right biscuits: Digestive biscuits or Graham crackers work best. They break apart easily and absorb moisture without becoming mushy.
-
Perfect the chocolate mixture: Ensure your melted chocolate is slightly cooled before folding in the biscuits. This helps maintain their crunch while allowing for even coating.
-
Add surprises: Consider adding nuts or mini marshmallows for added texture and flavor. They can give your cake a delightful crunch alongside the chocolate.
By keeping these tips in mind, you’ll be on your way to mastering the art of baking a delicious chocolate biscuit cake that friends and family will love!
Time details for Chocolate Biscuit Cake
When you decide to bake chocolate biscuit cake, knowing the time commitment involved can help you plan better. Here’s a breakdown of the timing:
Preparation time
To get everything ready, set aside about 20-30 minutes. This includes gathering your ingredients like digestive biscuits and rich chocolate, as well as mixing everything together.
Chilling time
Once your cake is assembled, it’s crucial to let it chill in the fridge for around 4-6 hours. This allows the flavors to meld beautifully and gives the cake a perfect texture.
Total time
In total, you’re looking at approximately 4-6 hours and 30 minutes from start to finish, with most of that time devoted to chilling. This makes it an ideal treat for gatherings, as you can prep it ahead and impress your guests effortlessly.
To explore more about chilling techniques, check out Serious Eats.
Nutritional Information for Chocolate Biscuit Cake
When you decide to bake chocolate biscuit cake, it’s important to know what you’re indulging in. Here’s a quick snapshot of its nutritional profile.
Calories per slice
On average, one slice of chocolate biscuit cake contains about 250–300 calories. While satisfying your sweet tooth, it’s wise to be mindful of portion sizes, especially if you’re treating yourself!
Sugar content
A typical slice has roughly 20 grams of sugar. This is definitely something to consider if you’re watching your sugar intake. Balancing your diet with healthier options during the day can make enjoying this treat more manageable.
Dietary considerations
For those with dietary restrictions, this cake is often adaptable. Consider swapping regular ingredients for gluten-free alternatives or using natural sweeteners. It’s always best to check labels to ensure you’re meeting your dietary needs. For more detailed dietary advice, you can refer to resources like the American Heart Association for tips on maintaining balance while enjoying your favorite treats.
Baking should be fun, and knowing what goes into your delicious creations makes it even better!
FAQs about Chocolate Biscuit Cake
Can I make chocolate biscuit cake without eggs?
Absolutely! Baking without eggs isn’t just possible; it can be delicious too! You can substitute eggs with ingredients like applesauce, mashed bananas, or yogurt, which not only help bind the mixture but also add a touch of sweetness. If you’re looking for a vegan option, consider using flaxseed meal mixed with water as an egg replacer. Just remember, the texture might vary slightly, but the end result will still be a rich, chocolatey treat.
How long will the cake last?
Once you bake your chocolate biscuit cake, you’ll want to savor it as long as possible! Typically, when stored in an airtight container at room temperature, the cake can last for about 3-5 days. If you want to extend its freshness, you can refrigerate it for up to a week. For longer storage, consider freezing individual slices; they can be kept for about a month. Just make sure to wrap them tightly to avoid freezer burn!
What is the best way to cut the cake?
Cutting your chocolate biscuit cake can be a bit tricky due to its dense texture. Here are some friendly tips:
- Use a sharp knife: Dull knives can squish the cake, making it harder to cut cleanly.
- Warm the knife: Dip your knife in hot water, dry it off, and then slice. This will provide a cleaner cut.
- Serve chilled: If possible, chill the cake slightly in the fridge before cutting; it holds its shape better when cold.
By following these simple tips, you’ll be able to enjoy perfectly cut slices every time!
For more tips on biscuits and baking, check out BBC Good Food for expert advice and recipes.
Conclusion on Chocolate Biscuit Cake
Why you should try this no-bake delight!
If you’re looking for a quick and indulgent dessert, you absolutely must bake chocolate biscuit cake! This delectable treat is not only easy to assemble but also delivers a rich, satisfying chocolate flavor that’s hard to resist. Plus, it requires no baking—perfect for those days when you want a dessert without the fuss.
The best part? You can customize it! Add your favorite nuts, dried fruits, or even a drizzle of caramel for an extra touch. This cake is versatile enough to suit any taste.
Give it a try and impress your friends at your next gathering. You won’t regret it! For more tasty inspirations, check out sources like BBC Good Food for a variety of dessert recipes.
PrintBake Chocolate Biscuit Cake: The Best Indulgent Treat for Any Occasion
This bake chocolate biscuit cake is a delightful treat that everyone will love, perfect for any celebration.
- Prep Time: 15 minutes
- Cook Time: 0 minutes
- Total Time: 4 hours 15 minutes
- Yield: 12 servings
- Category: Dessert
- Method: No-Bake
- Cuisine: British
- Diet: Vegetarian
Ingredients
- 200 grams digestive biscuits
- 100 grams unsweetened cocoa powder
- 250 grams unsalted butter
- 200 grams granulated sugar
- 4 large eggs
- 1 teaspoon vanilla extract
- 100 grams chocolate sprinkles
Instructions
- Start by crushing the digestive biscuits into small pieces.
- In a bowl, melt the unsalted butter with granulated sugar and cocoa powder.
- Once melted, stir in the eggs and vanilla extract until well combined.
- Add the crushed biscuits and mix until everything is coated.
- Pour the mixture into a lined cake tin and smooth the top.
- Chill in the fridge for at least 4 hours or until firm.
- Once set, remove from the tin and decorate with chocolate sprinkles.
Notes
- For a richer chocolate flavor, consider using dark chocolate instead of cocoa powder.
- This cake pairs wonderfully with whipped cream or a scoop of ice cream.
Nutrition
- Serving Size: 1 slice
- Calories: 350
- Sugar: 25 grams
- Sodium: 50 milligrams
- Fat: 20 grams
- Saturated Fat: 12 grams
- Unsaturated Fat: 6 grams
- Trans Fat: 0 grams
- Carbohydrates: 42 grams
- Fiber: 3 grams
- Protein: 5 grams
- Cholesterol: 80 milligrams