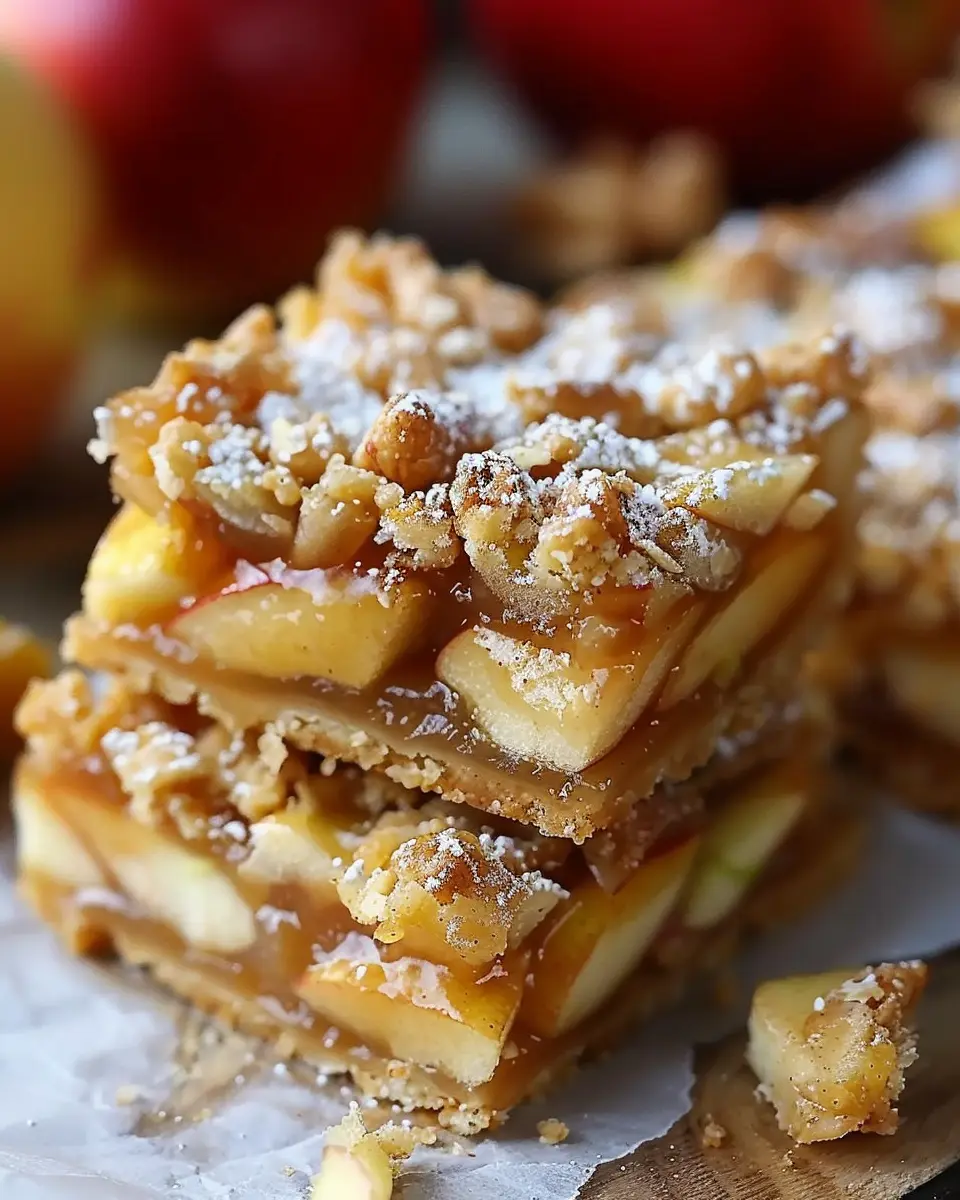
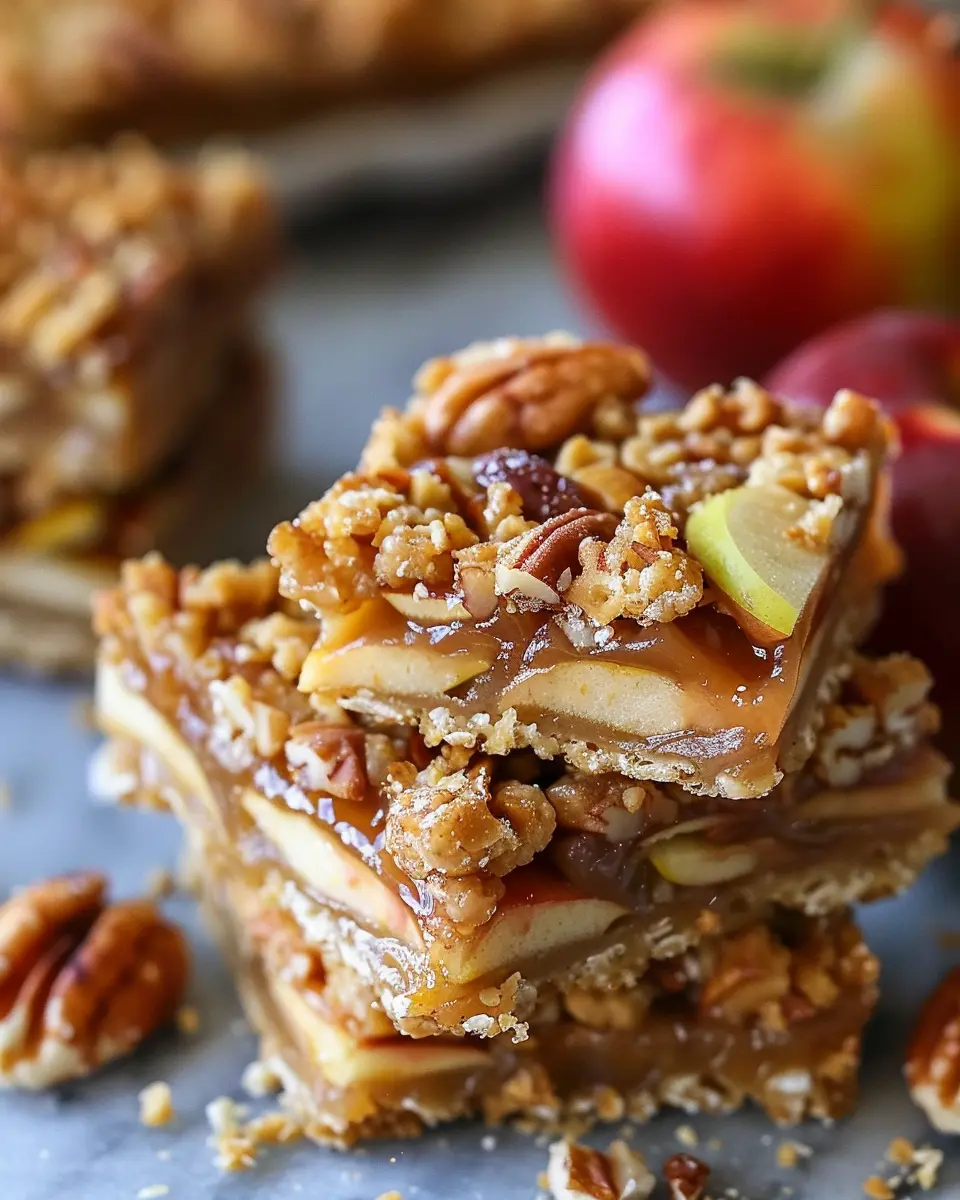
Introduction to Apple Bars
Apple bars are the quintessential homemade treat that effortlessly combine warmth, sweetness, and comfort into one delightful dessert. Whether it’s a crisp autumn afternoon or a cozy winter evening, the aroma of freshly baked apple bars evokes memories of family gatherings and shared laughter. This irresistible dessert brings the heartening flavors of baked apples, buttery crust, and a sprinkle of cinnamon right to your kitchen.
Why Apple Bars are the Perfect Homemade Treat
So why should you whip up a batch of these apple bars? The answer is simple: they are versatile, easy to make, and perfect for any occasion. With just a few ingredients, you can create a dish that impresses friends, family, or just indulges your sweet tooth after a long day.
-
Simplicity: The beauty of apple bars lies in their straightforward recipe. Even if you’re a novice in the kitchen, you’ll find that combining apples, flour, sugar, and spices is a delightful process. The steps are easy to follow, making them a great option for beginner bakers.
-
Customizable: Don’t hesitate to mix it up! Whether you prefer a more decadent version with caramel drizzle or a healthier take with oatmeal added, the possibilities are endless. You can even swap out different types of apples based on what’s in season—Fuji, Granny Smith, or Honeycrisp all work wonderfully!
-
Perfect for Sharing: These bars are easily cut into squares, making them ideal for potlucks, bake sales, or simply sharing with neighbors or colleagues. Who could resist a warm apple bar with a dollop of whipped cream or a scoop of vanilla ice cream?
As you venture into making these delicious bars, consider visiting The Spruce Eats for tips on selecting the best apples for baking. Trust me, the right apple can elevate your dessert experience dramatically. Plus, the delightful scent wafting through your home as they bake is the perfect invitation for anyone to join in on a sweet treat.
In the following sections, we’ll dive into the recipe details, ensuring you achieve the most scrumptious apple bars possible. So, grab those baking supplies and prepare for a fun culinary adventure!
Ingredients for Apple Bars
Essential ingredients you need
To whip up some delightful apple bars, you’ll want to gather these essential ingredients:
- Apples: Choose your favorites! Granny Smith or Honeycrisp work wonderfully.
- Butter: Unsalted butter is the best for controlling the saltiness.
- Flour: All-purpose flour provides the base for a perfect texture.
- Sugar: Granulated sugar adds sweetness; don’t skip it!
- Baking powder: This helps your bars rise and become fluffy.
- Eggs: Two large eggs give your bars structure and richness.
- Cinnamon: This aromatic spice brings warmth and compliments the apples beautifully.
Optional add-ins for extra flavor
Want to elevate your apple bars even further? Consider these tasty optional add-ins:
- Nuts: Chopped walnuts or pecans add a satisfying crunch.
- Dried fruit: Raisins or cranberries can introduce a chewy sweetness.
- Vanilla extract: A splash enhances the overall flavor profile.
- Oats: Sprinkle some rolled oats for a hearty touch.
These simple ingredients not only create delicious apple bars, but they also allow you to customize them to your liking. Baking is all about creativity, so get started! For more apple-inspired recipes, check out this guide on apple varieties to find your ideal choice.
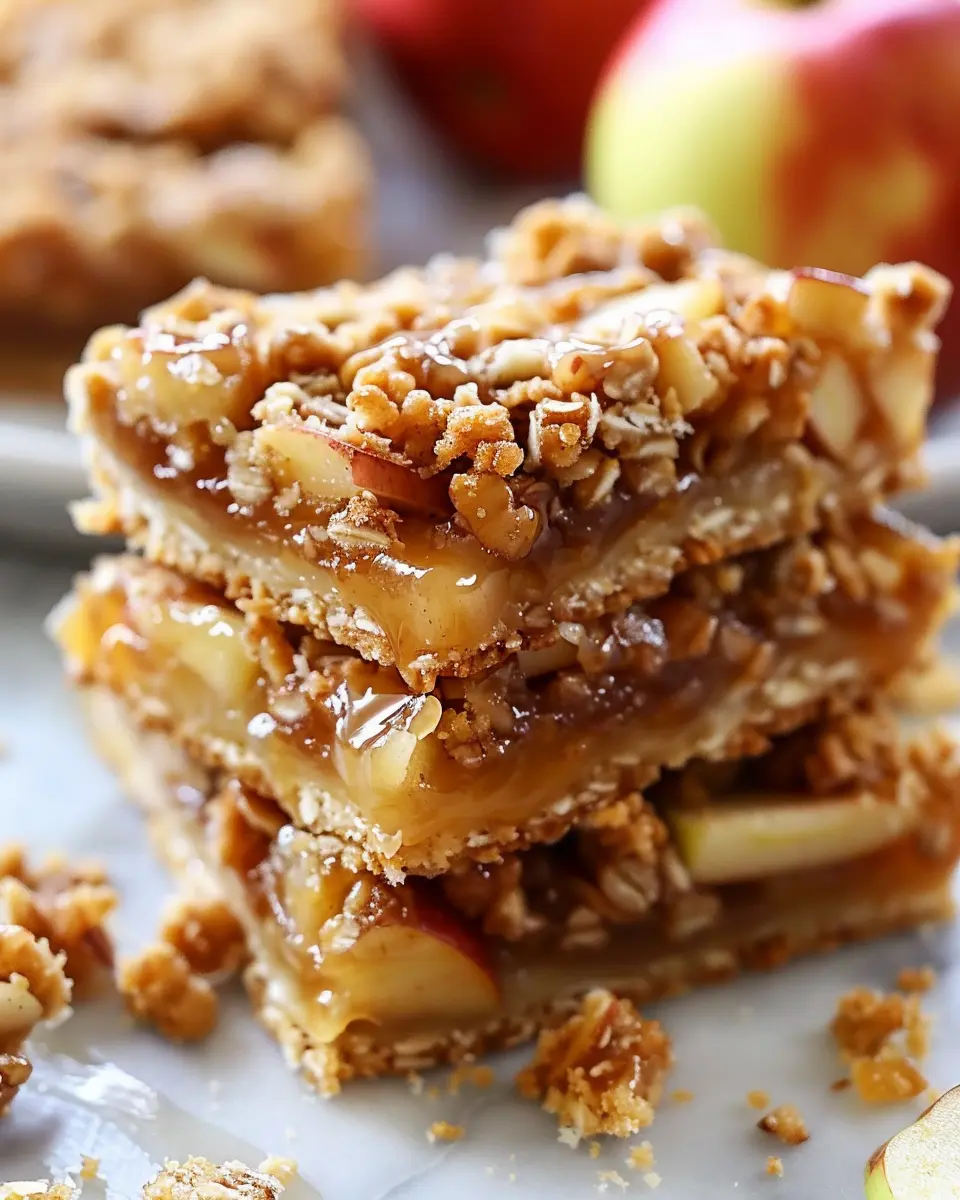
Step-by-step Preparation of Apple Bars
Creating apple bars from scratch can be a delightful kitchen adventure. Imagine biting into a warm, gooey treat that bursts with the flavors of sweet apples and comforting spices. Follow these easy steps, and you’ll have a batch of homemade apple bars ready to impress friends and family.
Preheat the oven and prep your baking dish
Before diving into the mixing and baking, it’s crucial to set yourself up for success by preheating the oven. Set it to 350°F (175°C). While that’s heating up, grab your preferred baking dish—an 8×8 inch or 9×13 inch pan works best for these delightful apple bars.
- Lightly grease the dish with butter or non-stick spray. This ensures that when your apple bars are done, they come out smoothly, allowing you to cut them into neat squares without tearing.
Prepare the apple mixture
The star of the show here is, of course, the apples! You’ll want to use about 4-5 medium-sized apples. A mix of tart and sweet varieties, like Granny Smith and Honeycrisp, creates a balanced flavor that truly elevates your bars.
- Peel and core the apples.
- Chop them into small cubes, aiming for about 2-3 cups. The smaller the pieces, the more evenly they’ll cook and blend into the bars.
In a large mixing bowl, toss these apple cubes with a few ingredients to enhance their natural sweetness and flavor:
- ½ cup of brown sugar
- 1 teaspoon of cinnamon
- A sprinkle of nutmeg, if desired
Let this mixture sit for about 10 minutes to allow the flavors to meld.
Combine the dry ingredients
While the apple mixture works its magic, it’s time to focus on the dry elements that will form the base of your apple bars. In a separate bowl, whisk together:
- 1 ½ cups of all-purpose flour
- 1 teaspoon of baking powder
- ½ teaspoon of salt
It’s essential to mix these thoroughly to ensure even distribution of the leavening agent and seasoning, which speaker Mike Genioux of the Culinary Institute stresses for achieving the perfect texture.
Mix the ingredients together
Now comes the fun part—mixing it all! In the bowl with your apple mixture, add:
- ½ cup of softened unsalted butter
- 1 beaten egg
- 1 teaspoon of vanilla extract
Stir these wet ingredients well until they are nicely combined. Then, gradually fold in your dry ingredients.
You want to be gentle here—too much stirring might overactivate the gluten in the flour, which could lead to tough bars. Aim for a batter that is thick yet spreadable.
Pour into the baking dish and bake
Once everything is combined, pour your apple bars batter into the prepared baking dish. Spread it evenly using a spatula, ensuring that the apple pieces are distributed throughout.
Now, it’s time to send these to the oven! Bake for 25-30 minutes or until the top is golden brown and a toothpick inserted in the center comes out clean.
Enjoying your apple bars
After the baking timer goes off, let your apple bars cool in the pan for about 15 minutes. This waiting time helps them set properly and makes cutting them easier. Have a taste, and you’ll find that the fragrant spices and tender apples make this recipe a beloved classic.
Baking is about exploration, so don’t hesitate to adapt this recipe by adding ingredients like walnuts or raisins for an extra twist. If you’re curious for more dessert ideas, check out this guide on baking perfect treats!
So, what are you waiting for? Roll up your sleeves and dive into this delightful baking experience!
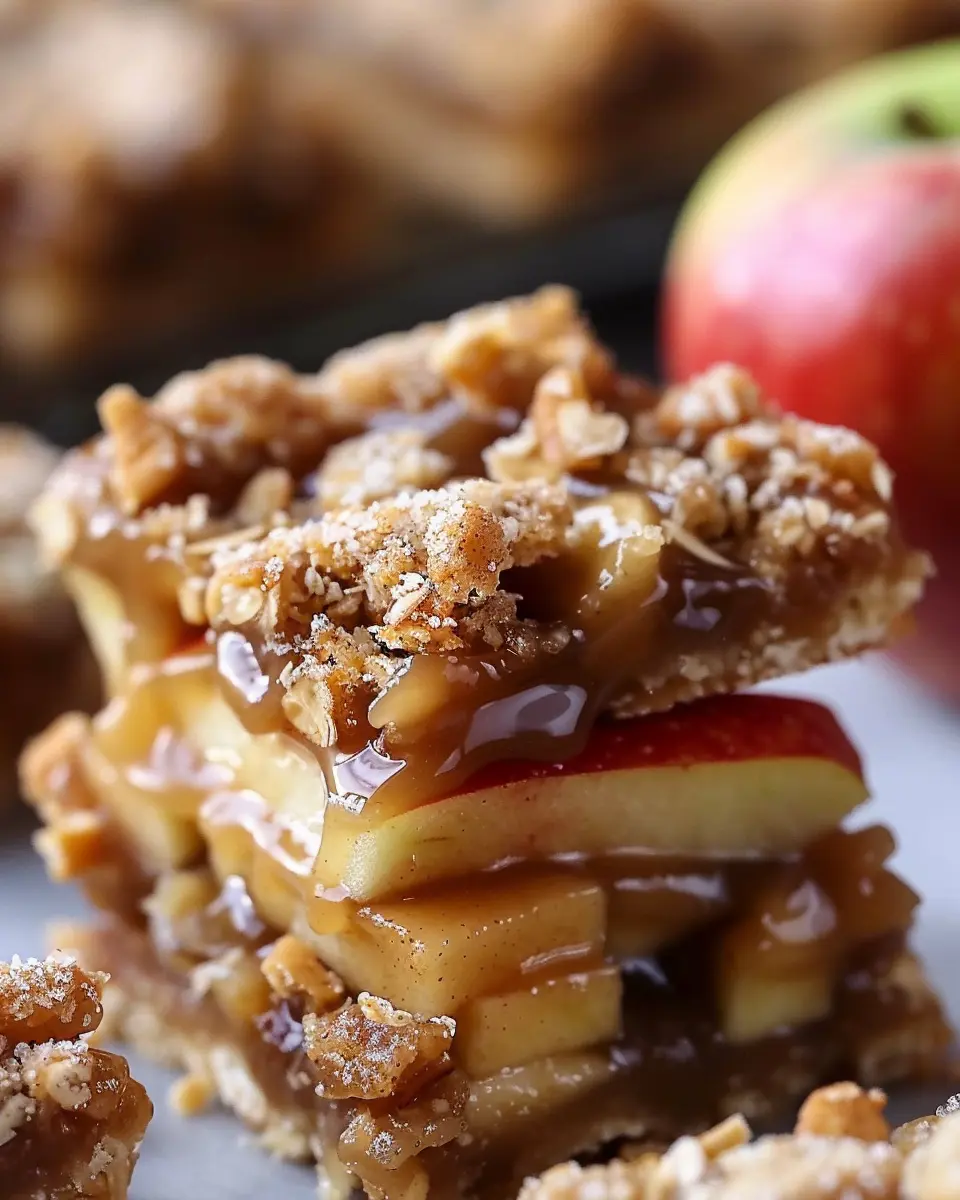
Variations on Apple Bars
Apple bars are a delicious, versatile treat, and there are countless ways to customize them. Here are a couple of variations that you might enjoy!
Apple Bars with Walnuts or Raisins
Adding a bit of texture and flavor can elevate your apple bars to a new level! For a delightful crunch, consider mixing in chopped walnuts. They not only add a nutty flavor but also boost the nutritional profile with healthy fats. If you’re a fan of dried fruit, try introducing raisins for a chewy contrast.
- How to incorporate: Simply fold in about a cup of chopped walnuts or raisins into your apple mixture before spreading it over the base.
- Flavor tip: Soaking raisins in warm water or apple juice for 10-15 minutes can enhance their sweetness and moisture, making them a perfect addition.
Delicious Gluten-Free Apple Bars
For those seeking gluten-free options, it’s easier than you might think to adapt apple bars without compromising on taste. Substitute regular flour with a gluten-free blend available in most grocery stores, or even try almond flour for a nutty flavor.
- Ingredient swap: Use equal parts gluten-free flour for the regular flour, and consider adding a bit of xanthan gum to help with texture.
- DIY almond flour: If you’re feeling adventurous, you can make your own by blending almonds until finely ground, which can be a fun and tasty alternative.
These variations are sure to please any crowd, whether you’re at a cozy gathering or just craving a warm slice at home. Remember, your creativity is the limit, so feel free to experiment with different ingredients! For more on gluten-free baking, check out resources from Gluten Intolerance Group.
Cooking Tips and Notes for Apple Bars
Common pitfalls to avoid
Baking apple bars can be a delightful experience, but there are several common pitfalls you’ll want to avoid. For starters, don’t overmix your batter; this can lead to dense bars rather than the light, chewy texture you’re aiming for. Make sure to use a mix of tart and sweet apples for a balanced flavor. Also, keep an eye on your baking time. It’s tempting to leave them in for just a few more minutes, but overshooting can result in dry bars. If in doubt, check for doneness a little early!
Enhancing flavor with spices
One of the easiest ways to elevate your apple bars is by enhancing the flavor with spices. Cinnamon is a classic choice, but don’t overlook nutmeg or allspice! A sprinkle of ginger can also bring a lovely warmth. According to The Spice House, fresh spices can significantly increase flavor potency, leading to more delicious bars that wow your friends and family. A hint of vanilla extract adds complexity that pairs wonderfully with the apples too. Remember, the right blend can turn a simple dessert into a showstopper!
Serving Suggestions for Apple Bars
Pairing with Ice Cream
One of the most delightful ways to enjoy apple bars is by serving them with a scoop of your favorite ice cream. Imagine warm apple cinnamon flavor combined with creamy vanilla or caramel ice cream; it’s a match made in heaven! For a fun twist, try a scoop of salted caramel or even a scoop of butter pecan.
If you want to elevate the experience further, consider drizzling a bit of caramel or chocolate sauce over the top. This not only enhances the visual appeal but adds an extra layer of sweetness that perfectly complements the tartness of the apples.
Serving Warm vs. Cold
When it comes to apple bars, the age-old debate of serving them warm or cold is worth considering. Serving them warm straight from the oven is comforting and allows the flavors to shine. The gooey filling, combined with a crispy crust, makes for a fantastic dessert experience.
On the other hand, chilled apple bars can be a refreshing treat—perfect for warm weather or when you want something less toasty. Whichever way you choose, your guests will love the rich apple goodness!
For more serving ideas, check out this guide on how to serve desserts. If you’re interested in pairing drinks, see our tips on delicious non-alcoholic options here.
Time Breakdown for Apple Bars
When you’re ready to whip up some delightful apple bars, it helps to know how much time to allocate for each step in the process. Here’s a simple breakdown to guide you.
Preparation Time
You’ll want to set aside about 20-25 minutes for preparation. This includes peeling and slicing those delicious apples and mixing the dough. Don’t rush—taking your time here ensures every bite is packed with flavor!
Cooking Time
Once everything is prepped, baking your apple bars will take approximately 30-35 minutes. It’s often tempting to check early, but letting them bake fully ensures that perfect golden-brown finish.
Total Time
In total, you’re looking at around 55-60 minutes from start to finish. Just enough time to pour yourself a refreshing drink (how about some iced tea?). You’ll be enjoying your delectable apple bars in no time!
For tips on how to get the best texture and flavor in your apple bars, check out this resource that highlights the science of baking. Happy baking!
Nutritional Facts for Apple Bars
Caloric Content and Serving Size
When indulging in apple bars, knowing their caloric content helps you enjoy them guilt-free. One serving, typically a 2-inch square, contains around 150 calories. If you’re planning to share or save some for later, one batch usually yields 16 servings. Perfect for gatherings or just a sweet treat during the week!
Key Nutritional Information
These delightful apple bars pack more than just calories; they offer essential nutrients as well. Here’s a quick breakdown:
- Carbohydrates: Approximately 25g, mainly from whole grains and apples, giving you energy.
- Fiber: About 2g, supporting digestion and keeping you full longer.
- Sugars: Naturally occurring sugars from the apples balance the sweetness.
- Protein: Roughly 2g, especially if you add nuts or seeds.
Overall, apple bars can be a wholesome addition to your snack rotation! For more tips on healthy snacking, check out this article on nutritional benefits of apples. Remember, moderation is key to enjoying your treats while maintaining a balanced diet!
FAQs about Apple Bars
How can I store leftover apple bars?
Storing your delicious apple bars properly is essential to keep them fresh and tasty! Once they’ve cooled completely, place them in an airtight container. You can keep them at room temperature for about 2 days. If you want to extend their shelf life, consider storing them in the fridge. They can stay good for up to a week this way, and you can always reheat them in the oven for a few minutes for that fresh-baked taste again.
Can I freeze apple bars for later?
Absolutely! Freezing your apple bars is a fantastic way to save some for later, especially if you’ve made a big batch. Simply wrap each bar tightly in plastic wrap and then place them in a freezer-safe bag or container. They can last up to 3 months in the freezer. When you’re ready to enjoy them, just thaw them in the fridge overnight or pop them in the microwave for a quick treat.
What variety of apples works best for this recipe?
Choosing the right apple makes all the difference in your apple bars! For the perfect blend of tart and sweet, consider using Granny Smith or Honeycrisp apples. These varieties hold their shape well during baking, offering a delightful texture alongside the soft, rich bars. If you prefer a sweeter flavor, Fuji or Gala apples can also be great options.
Looking for more tips? Check out resources from sites like EatingWell and Epicurious for further apple selection advice and innovative ideas!
Conclusion on Apple Bars
Embracing homemade desserts for your busy lifestyle
As you navigate the hustle and bustle of life, embracing homemade desserts like apple bars can be a game changer. Not only do they offer a delightful way to satisfy your sweet tooth, but they also allow you to control the ingredients, ensuring your treats are both delicious and wholesome. With just a few simple steps, you can create a batch of comforting apple bars that will impress friends and family alike.
Imagine the aroma of baked apples wafting through your home—there’s nothing quite like it, right? Plus, these bars can be easily prepared in advance, making them perfect for busy weeknights. So why not gather some fresh apples and give this recipe a try? You deserve a treat that makes you feel good inside and out!
For more inspiration on scrumptious homemade desserts, check out resources from The Kitchn and Serious Eats.
PrintApple Bars: Easy and Indulgent Fall Treats You’ll Love
Delight in the sweet and spiced flavors of these easy-to-make apple bars. Perfect for fall gatherings!
- Prep Time: 15 minutes
- Cook Time: 30 minutes
- Total Time: 45 minutes
- Yield: 12 bars
- Category: Desserts
- Method: Baking
- Cuisine: American
- Diet: Vegetarian
Ingredients
- 3 cups diced apples
- 1 cup all-purpose flour
- 1/2 cup brown sugar
- 1/4 cup granulated sugar
- 1 teaspoon cinnamon
- 1/2 teaspoon nutmeg
- 1/2 teaspoon baking powder
- 1/4 teaspoon salt
- 1/2 cup unsalted butter, melted
- 2 large eggs
- 1 teaspoon vanilla extract
Instructions
- Preheat your oven to 350°F (175°C) and grease a baking dish.
- In a large bowl, combine the diced apples, brown sugar, granulated sugar, cinnamon, nutmeg, baking powder, and salt.
- In another bowl, mix the melted butter, eggs, and vanilla extract until well combined.
- Pour the wet ingredients into the dry ingredients and stir until just combined.
- Spread the mixture evenly in the prepared baking dish.
- Bake for 25-30 minutes or until golden brown and a toothpick comes out clean.
- Let cool before cutting into bars.
Notes
- Serve warm or at room temperature for the best flavor.
- Add a scoop of vanilla ice cream for an indulgent treat.
Nutrition
- Serving Size: 1 bar
- Calories: 180
- Sugar: 15g
- Sodium: 150mg
- Fat: 7g
- Saturated Fat: 4g
- Unsaturated Fat: 2g
- Trans Fat: 0g
- Carbohydrates: 25g
- Fiber: 2g
- Protein: 2g
- Cholesterol: 40mg